Test Framework 적용하기
근래 테스트 자동화와 리포팅의 필요성을 느껴 프로젝트에 Unity Test Framework를 적용하려 한다.
어떻게 적용하는지, 코드 작성 방법은 무엇인지 알아보는 글이 되겠다.
Test Framework 시작하기
Package Manager에서 Test Framework를 설치하고, Window/General/Test Runner를 실행해준다.


Test Framework 적용하기

이 창에서 테스트 코드를 만들거나 재생할 수 있다.
상단에 PlayMode/EditMode가 나뉘어져 있는 것을 확인할 수 있는데, PlayMode는 에디터 플레이 중에 작동한다.
반면에 EditMode는 에디터에서만 작동하므로 에디터 전용 테스트에 유용할 것이다.
아무튼, 나는 PlayMode에서 테스트 항목을 만들고 싶었으므로 Create PlayMode Test Assembly Folder를 누르겠다.

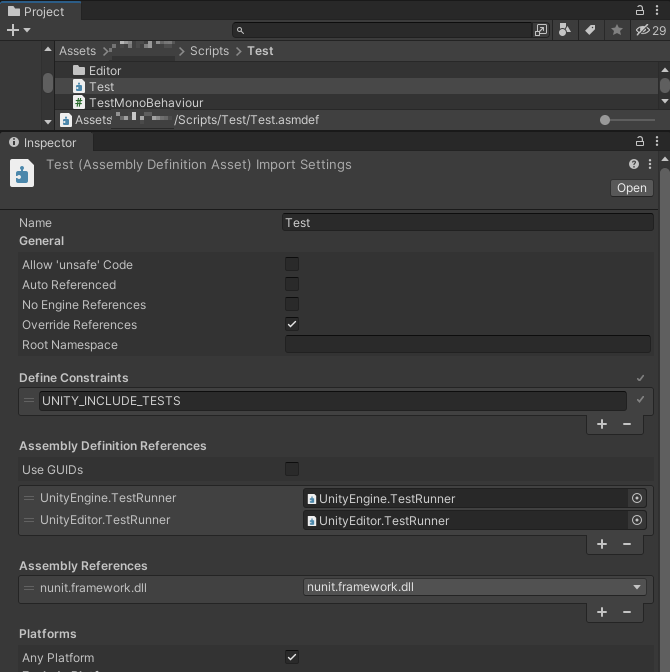
그러면 Test 폴더와 Test 어셈블리 정의가 만들어진다.
UnityEngine.TestRunner와 UnityEditor.TestRunner, nunit.framework.dll가 레퍼런스에 추가되어 있다.
이제 테스트 러너의 Create Test Script in current folder 버튼을 눌러 새 테스트 코드를 생성해보겠다.
using System.Collections;
using System.Collections.Generic;
using NUnit.Framework;
using UnityEngine;
using UnityEngine.TestTools;

public class EventTest
{
    // A Test behaves as an ordinary method
    [Test]
    public void EventSimplePasses()
    {
        // Use the Assert class to test conditions
    }

    // A UnityTest behaves like a coroutine in Play Mode. In Edit Mode you can use
    // `yield return null;` to skip a frame.
    [UnityTest]
    public IEnumerator EventWithEnumeratorPasses()
    {
        // Use the Assert class to test conditions.
        // Use yield to skip a frame.
        yield return null;
    }
}
그러면 일반적인 void 리턴형 코드나, IEnumerator 리턴형인 코루틴 코드를 볼 수 있다.
이렇게 자동으로 작성된 코드는 그냥 작성법을 알려주는 것 뿐이라, 굳이 버튼을 눌러 코드를 매번 생성할 필요는 없다.
그냥 일반적인 코드에 using NUnit.Framework를 선언하고, 각 함수에 [Test] 또는 [UnityTest] 속성을 붙이면 된다.
자세한 테스트 프레임워크의 코드 레퍼런스는 아래 링크에서 확인할 수 있다.
https://docs.unity3d.com/Packages/com.unity.test-framework@1.1/manual/manual.html#reference
Unity Test Framework manual | Test Framework | 1.1.33
docs.unity3d.com
글 아래에서는 필요해보이는 부분만 요약해서 작성하겠다.

코드가 작성되었으니 테스트러너에 두 개의 테스트가 만들어진 것을 확인할 수 있다.
각각을 클릭하면 자동으로 플레이 모드로 구동한 뒤 버그 발생여부에 따라 체크 표시가 생긴다.
물론, 우측 상단에서 Run All Tests를 클릭하여 순차적으로 진행하는 방법도 있다.
테스트 코드 작성하기
Test 속성과 UnityTest 속성의 차이
단순히 코루틴이 아님과 코루틴인 것의 차이이다.
코루틴을 사용하고 싶다면 UnityTest 속성을 사용하도록 하자.
UnitySetUp, UnityTearDown 속성
해당 클래스의 테스트를 실행하기 전과 후에 처리를 할 수 있는 속성이다.
public class SetUpTearDownExample
{
    [UnitySetUp]
    public IEnumerator SetUp() => yield return new EnterPlayMode();

    [Test]
    public void MyTest() => Debug.Log("This runs inside playmode");

    [UnityTearDown]
    public IEnumerator TearDown() => yield return new ExitPlayMode();
}
SetUp은 MyTest를 실행하기 전, 그리고 TearDown은 MyTest를 실행한 후 작동하게 된다.
Test가 2개 이상일 경우에도 같은 클래스 안에 있다면 SetUp과 TearDown은 전체 과정에 걸쳐 작동된다.
SetUp -> MyTest1 -> MyTest2 -> TearDown
테스트 결과 체크하기
단순히 에러를 내지 않으면 테스트는 성공으로 종료되지만, 테스트 구문 중간에 추가적인 조건 테스트를 수행해야 할 경우도 있다.
그럴 때에는 UnityEngine.Assertions.Asserts를 사용하거나, Debug.Assert를 사용하는 것이 좋다.
Assert는 조건이 맞지 않는 경우 에러를 띄우며, 에러 메시지와 콜스택을 보여 준다.
테스트를 코드에서 호출하기
var testRunnerApi = ScriptableObject.CreateInstance<TestRunnerApi>();
var filter = new Filter()
{
    testMode = TestMode.PlayMode
};
testRunnerApi.Execute(new ExecutionSettings(filter));
위 코드는 Play Mode에 있는 모든 테스트를 한꺼번에 실행한 것이다.
물론 필터를 걸어 특정 이름이나 클래스에 있는 테스트들만 구동할 수도 있다.
다만, 플레이 모드를 진행 중인 경우에는 구동할 수 없으니 주의하자.
var api = ScriptableObject.CreateInstance<TestRunnerApi>();
api.Execute(new ExecutionSettings(new Filter()
{
    testNames = new[] {"MyTestClass.NameOfMyTest", "SpecificTestFixture.NameOfAnotherTest"}
}));'프로그래밍 > Unity' 카테고리의 다른 글
| 언어권에 따른 String 변환에 주의하자 (0) | 2023.02.20 |
|---|---|
| is null 연산은 유니티의 ==를 사용하지 않는다 (0) | 2023.02.09 |
| UniTask 파헤치기 (0) | 2022.09.27 |
| Unity Device Simulator 알아보기 (0) | 2022.07.18 |
| Unity Null Check할 때 성능을 개선할 수 있는 방법 (2) | 2022.05.01 |